part8 (1)

Deploy AWS Target Group, Elastic Load Balancer & ELB Listener Using Terraform

Welcome back to the series of Deploying On AWS Cloud Using Terraform 👨🏻‍💻. In this entire series, we will focus on our core concepts of Terraform by launching important basic services from scratch which will take your infra-as-code journey from beginner to advanced. This series would start from beginner to advance with real life Usecases and Youtube Tutorials.

If you are a beginner for Terraform and want to start your journey towards infra-as-code developer as part of your devops role buckle up 🚴‍♂️ and lets get started and understand core Terraform concepts by implementing it…🎬

🔎Basic Terraform Configurations🔍

As part of basic configuration we are going to setup 3 terraform files

1. Providers File:- Terraform relies on plugins called “providers” to interact with cloud providers, SaaS providers, and other APIs.

Providers are distributed separately from Terraform itself, and each provider has its own release cadence and version numbers.
The Terraform Registry is the main directory of publicly available Terraform providers, and hosts providers for most major infrastructure platforms. Each provider has its own documentation, describing its resource types and their arguments.
We would be using AWS Provider for our terraform series. Make sure to refer Terraform AWS documentation for up-to-date information.
Provider documentation in the Registry is versioned; you can use the version menu in the header to change which version you’re viewing.

 provider "aws" { 
 region = "var.AWS_REGION" 
 shared_credentials_file = "" 
 }

2. Variables File:- Terraform variables lets us customize aspects of Terraform modules without altering the module’s own source code. This allows us to share modules across different Terraform configurations, reusing same data at multiple places.

When you declare variables in the root terraform module of your configuration, you can set their values using CLI options and environment variables. When you declare them in child modules, the calling module should pass values in the module block.

variable "AWS_REGION" {
  default = "us-east-1"
}
data "aws_vpc" "GetVPC" {
filter {
    name   = "tag:Name"
    values = ["CustomVPC"]
          }
}

3. Versions File:- It’s always a best practice to maintain a version file where you specific version based on which your stack is testing and live on production.

 terraform { 
 required_version = ">= 0.12" 
 }

🎨 Diagrammatic Representation 🎨
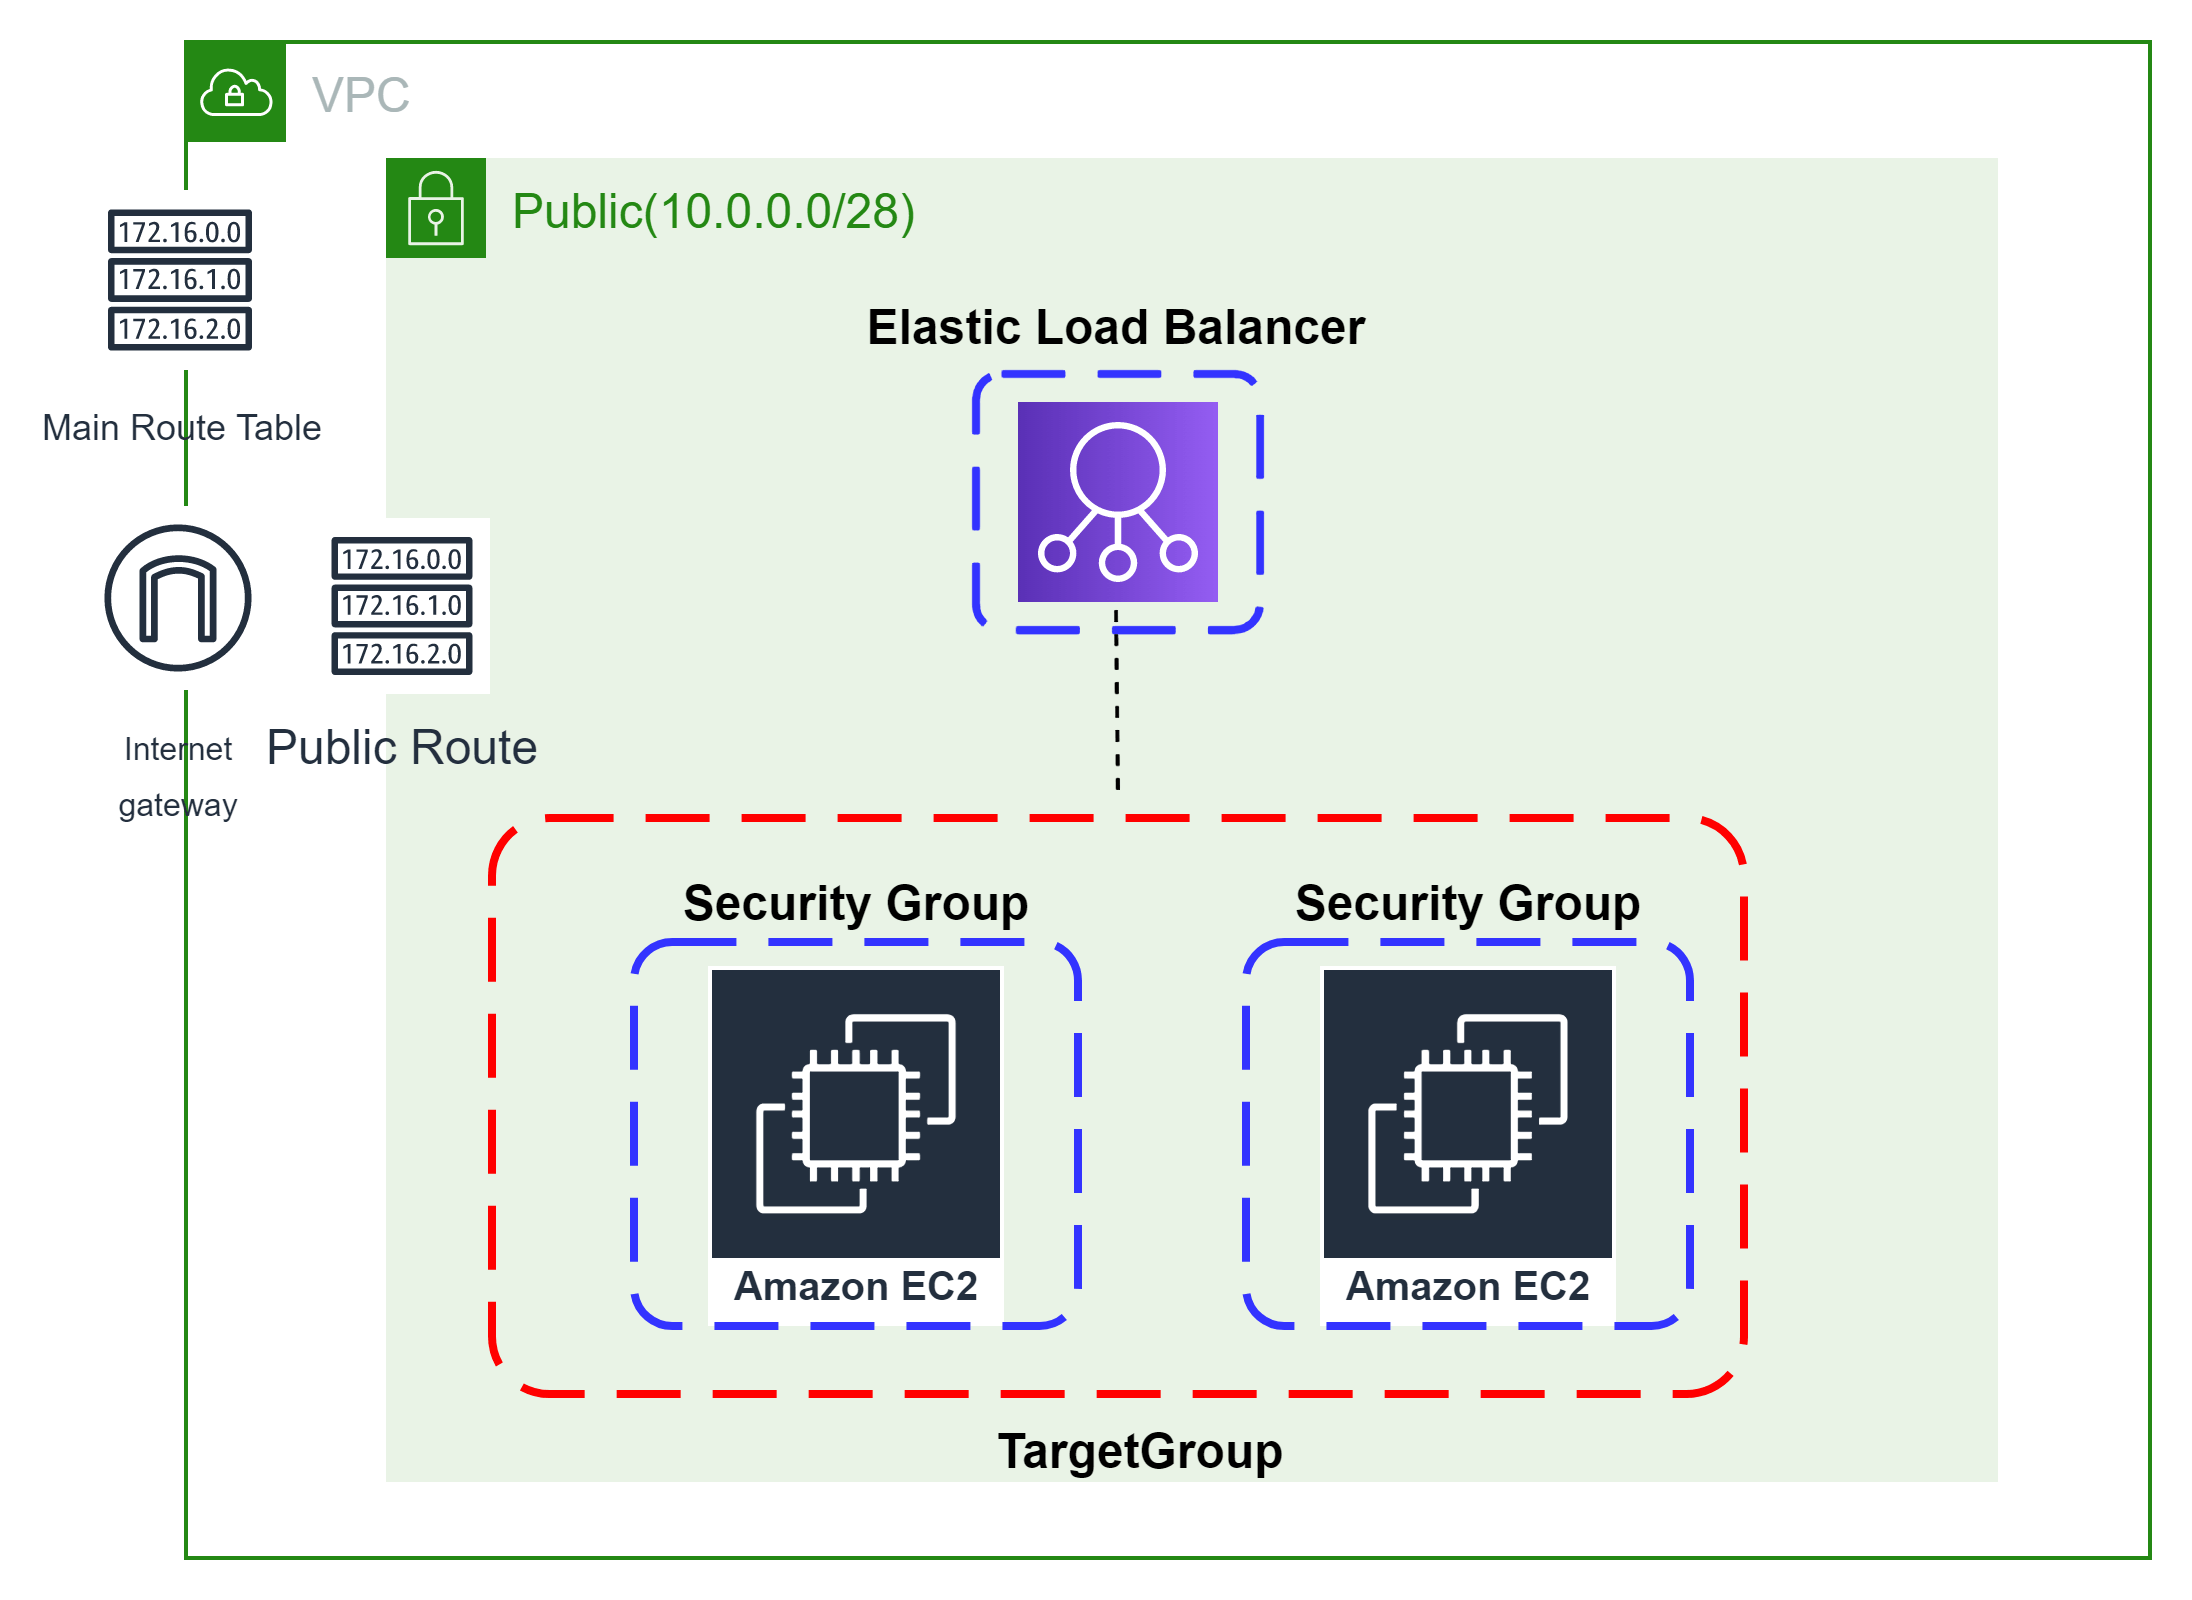
image.png

Before creating a Target Group let’s first define a data block to fetch a list of the EC2 instance in a running state.

data "aws_instances" "ec2_list" {
  instance_state_names = ["running"]
}

✦ aws_lb_target_group:- This resource group resources for use so that it can be associated with load balancers.

✦ name:- This is an optional argument to define the name of the target group.
✦ port:- This is a mandatory argument to mention the port on which targets receive traffic unless overridden when registering a specific target.
✦ vpc_id:- This is a mandatory argument and refers to id of a VPC to which it would be associated.
✦ protocol:- This is a mandatory argument as our target type is “instance”. Protocol to use for routing traffic to the targets. Should be one of “TCP”, “TLS”, “UDP”, “TCP_UDP”, “HTTP” or “HTTPS”.
✦ target_type:- This is an optional argument with target types as an instance, IP, and lambda.

resource "aws_lb_target_group" "CustomTG" {
  name     = "CustomTG"
  port     = 80
  protocol = "HTTP"
  vpc_id   = data.aws_vpc.GetVPC.id
  target_type = "instance"
}

✦ aws_lb_target_group_attachment:- This resource provides us the ability to register containers and instances with load balancers.

✦ target_group_arn:- This is a mandatory argument to mention the target group ARN which would be associated with the target id.
✦ port:- This is a mandatory argument to mention the port on which targets receive traffic unless overridden when registering a specific target.
✦ target_id:- This is a mandatory argument to mention the target id as the Instance ID for an instance or the container ID for an ECS container.

resource "aws_lb_target_group_attachment" "CustomTGAttach" {
  count = "${length(data.aws_instances.ec2_list.ids)}"
  target_group_arn = aws_lb_target_group.CustomTG.arn
  target_id        = "${data.aws_instances.ec2_list.ids[count.index]}"
  port             = 80
}

Before Creating a Load Balancer lets create a data source variable to fetch a list of subnets

data "aws_subnet_ids" "GetSubnet_Ids" {
  vpc_id = data.aws_vpc.GetVPC.id
  filter {
    name   = "tag:Type"
    values = ["Public"]
  }
}

Configure Security Group For Load Balancer
The method acts as a virtual firewall to control your inbound and outbound traffic flowing to your EC2 instances inside a subnet.

✦ aws_security_group:- This resource is define traffic inbound and outbound rules on the subnet level.

✦ name:- This is an optional argument to define the name of the security group.
✦ description:- This is an optional argument to mention details about the security group that we are creating.
✦ vpc_id:- This is a mandatory argument and refers to the id of a VPC to which it would be associated.
✦ tags:- One of the most important property used in all resources. Always make sure to attach tags for all your resources. EGRESS & INGRESS are processed in attribute-as-blocks mode.

resource "aws_security_group" "elb_sg" {
  name        = "allow_http_elb"
  description = "Allow http inbound traffic for elb"
  vpc_id      = data.aws_vpc.GetVPC.id

  ingress {
    from_port   = 443
    to_port     = 443
    protocol    = "tcp"
    cidr_blocks = ["0.0.0.0/0"]
  }

  ingress {
    from_port   = 80
    to_port     = 80
    protocol    = "tcp"
    cidr_blocks = ["0.0.0.0/0"]
  }

  egress {
    from_port   = 0
    to_port     = 0
    protocol    = "-1"
    cidr_blocks = ["0.0.0.0/0"]
  }
  tags = {
    Name = "terraform-elb-security-group"
  }
}

Create a Load Balancer and associate it with public subnets and the security group of the load balancer.

✦ aws_lb:- This resource is used to create a load balancer that helps us distribute our traffic.

✦ name:- This is an optional argument to define the name of the Load Balancer.
✦ subnets:- This is an optional argument to mention which load balancer will be part of which subnets.
✦ security_groups:- This is an optional argument to mention which controls your inbound and outbound traffic flowing.
✦ tags:- One of the most important property used in all resources. Always make sure to attach tags for all your resources.

resource "aws_lb" "CustomELB" {
  name = "CustomELB"
  subnets = data.aws_subnet_ids.GetSubnet_Ids.ids
  security_groups = [aws_security_group.elb_sg.id]
  tags = {
    Name = "CustomELB"
  }
}

Let’s now create a new load balancer listener which will be configured to accept HTTP client connections.

✦ aws_lb_listener:- This resource is used to create a load balancer listener which helps us to check for connection requests, using the protocol and port that you configure.

✦ load_balancer_arn:- This is a mandatory argument to define arn of the Load Balancer by using arn attribute.
✦ port:- This is an optional argument to mention the port on which targets receive traffic.
✦ protocol:- This is an optional argument as our target type is “instance”. Protocol to use for routing traffic to the targets. Should be one of “TCP”, “TLS”, “UDP”, “TCP_UDP”, “HTTP” or “HTTPS”.
✦ default_action:- This is a mandatory argument to define the type of routing for this listener.

resource "aws_lb_listener" "http" {
  load_balancer_arn = aws_lb.CustomELB.arn
  port              = "80"
  protocol          = "HTTP"
  default_action {
    type = "forward"
    forward {
      target_group {
        arn = aws_lb_target_group.CustomTG.arn
      }
      stickiness {
        enabled  = true
        duration = 28800
      }
    }
  }
}

Output values make information about your infrastructure available on the command line, and can expose information for other Terraform configurations to use. Output values are similar to return values in programming languages.

output "CustomTG" {
  value       = aws_lb_target_group.CustomTG.id
  description = "This is Target Group id."
}
output "CustomELB" {
  value       = aws_lb.CustomELB.id
  description = "This is load balancer ID."
}
output "elb_sg" {
  value       = aws_security_group.elb_sg.id
  description = "This is Security Group ID."
}

🔊To view the entire GitHub code click here

  1️⃣ The terraform fmt command is used to rewrite Terraform configuration files to a canonical format and style👨‍💻.

terraform fmt

2️⃣ Initialize the working directory by running the command below. The initialization includes installing the plugins and providers necessary to work with resources. 👨‍💻

terraform init

3️⃣ Create an execution plan based on your Terraform configurations. 👨‍💻

terraform plan

4️⃣ Execute the execution plan that the terraform plan command proposed. 👨‍💻

terraform apply --auto-approve

⛔️ Hashicorp Terraform
⛔️ AWS CLI
⛔️ Hashicorp Terraform Extension Guide
⛔️ Terraform Autocomplete Extension Guide
⛔️ AWS Security Group
⛔️ AWS Target Group
⛔️ AWS Target Group Attachment
⛔️ Terraform Length Function
⛔️ AWS Load Balancer
⛔️ AWS Load Balancer Listener

In this blog, we have configured the below resources
✦ AWS Security Group for the Load Balancer.
✦ AWS Target Group and its attachment.
✦ AWS Load Balancer and its listener.
I have also referenced what arguments and documentation we are going to use so that while you are writing the code it would be easy for you to understand terraform official documentation. Stay with me for the next blog where we will be doing deep dive into AWS Launch Configuration & Autoscaling Group Using Terraform.

📢 Stay tuned for my next blog…..

So, did you find my content helpful? If you did or like my other content, feel free to buy me a coffee. Thanks.

Dheeraj_Pic1 (2)

Author - Dheeraj Choudhary

I am an IT Professional with 11+ years of experience specializing in DevOps & Build and Release Engineering, Software configuration management in automating, build, deploy and release. I blog about AWS and DevOps on my YouTube channel, which focuses on content such as, AWS, DevOps, open source, AI-ML and AWS community activities.

RELATED ARTICLES

AWS Glue Presentation (1)

Automate S3 Data ETL Pipelines With AWS Glue Using Terraform

Discover how to automate your S3 data ETL pipelines using AWS Glue and Terraform in this step-by-step tutorial. Learn to efficiently manage and process your data, leveraging the power of AWS Glue for seamless data transformation. Follow along as we demonstrate how to set up Terraform scripts, configure AWS Glue, and automate data workflows.

8 Responses

Add a Comment

Your email address will not be published. Required fields are marked *